I was talking with my nephew the other day - about a subject totally unrelated to computers - but he asked a very interesting question during our discussion.
How do I know what's bad if I don't know what's good?
What a great question! Especially when you're dealing with complex attack techniques in today's world. If you're trying to figure out if you've been compromised, then you'd better know what should be there. That way, you know when something out of the ordinary shows up.
For the next few posts, I'm going to talk about several Windows processes and what you should know about them.
Today, let's talk about services.exe. Also known as the Service Control Manager.
What is it? Where should it be? How many instances should I see running in task manager? Most importantly, is services.exe safe?
What is it: Services.exe is designed to start and stop Windows system processes as well as handle scheduled tasks. It also launches the Service Control Manager (SCM), which runs at system startup, and loads services and device drives marked for auto-start. It also maintains the database of installed services, locking and unlocking the service database and sends request to the running services.
If you're familiar with the Last Known Good control set, SCM (services.exe) is the process that gives the thumbs to whether a user has successfully logged on interactively.
Where should it be: %systemroot\system32\services.exe
How many should there be when I open up task manager: One.
Parent process: wininit.exe
So the final verdict on the safety of services.exe? If there is only one process running and it located in %systemroot\system32\services.exe, you should be good.

Friday, December 7, 2018
Wednesday, October 3, 2018
Check out my guest appearance on the SecureTalk podcast
Check out my guest appearance on the SecureTalk podcast hosted by Mark Shriner from Adaquest - https://soundcloud.com/user-779694357/andrea-fisher-provides-an-overview-of-windows-10
Mark and I had a great chat about Windows 10 and Win 10 security
#windows10 #microsoft #markshriner
Mark and I had a great chat about Windows 10 and Win 10 security
#windows10 #microsoft #markshriner
Tuesday, October 2, 2018
Security is the Baseline
The Windows 10s October 2018 Update (version 1809) also known as Redstone 5 made its debut into the world this week.
There are lots of amazing features that I will highlight over the coming days but one of the first things we should do as responsible IT folk is to secure the OS.
There are lots of amazing features that I will highlight over the coming days but one of the first things we should do as responsible IT folk is to secure the OS.
Every organization faces security threats. However, the types of security threats that are the biggest problem for one organization could be completely different from another organization. For example, an e-commerce company may focus on protecting its Internet-facing web apps, while a hospital may focus on protecting confidential patient information. The one thing that all organizations have in common is a need to keep their apps and devices secure. These devices must be compliant with the security standards (or security baselines) defined by the organization.
Years ago, Microsoft introduced the idea of the security baseline. A security baseline is a group of Microsoft-recommended configuration settings. These settings are based on feedback from Microsoft security engineering teams, product groups, partners, and customers.
If you haven't tried out the security configuration baseline settings for Windows or Windows Server, please check them out.
You can download the content here: Windows-10-1809-Security-Baseline-DRAFT.zip
Thursday, September 20, 2018
What can I learn about WDATP at Ignite 2018?
Microsoft Ignite is next week. Can you believe it?
Here are a few sessions that I recommend to enhance your knowledge of WDATP and all it's fun new features.
#wdatp #Microsoft #security
Here are a few sessions that I recommend to enhance your knowledge of WDATP and all it's fun new features.
#wdatp #Microsoft #security
Friday, September 7, 2018
In a world where danger lies behind every click...
As a former SCCM admin, I spent countless hours trying to make sure all the machines in my environment were patched and as secure as possible. That was a Herculean feat ten years ago and the changes in attack vectors have changed dramatically that things aren't much better today than they were back then.
But yesterday, Windows Defender Advanced Threat Protection got an amazing new feature in that is designed to help you stay more aware of the vulnerabilities in your environment.
This feature is called Threat Analytics - a set of interactive reports on significant and emerging attack campaigns that fuses organizational risk analytics with threat intelligence.
When
a new major event, such as the zero day or other major
outbreak, occurs - the WDATP research team publishes a special threat analytics
report with data about the event that allows the customer to see:
- An overview of the zero day or exploit
- If they are currently at risk (mitigation status)
- If they are affected by someone exploiting this zero day (machines with alerts)
- Get recommendation of actions they need to take

This robust tool gives security teams real-time information that helps them understand the nature of the threat and evaluates impact on their environment. Threat Analytics also provides recommendations and guidance on how to contain the threat.
#wdatp #microsoftadvocate
Tuesday, July 31, 2018
Hunting for PowerShell with WDATP Advanced Hunting
Advanced Hunting is one of the fantastic new features in the latest version of WDATP. I thought I would show you how to hunt to see if an encoded PowerShell script has been run in your environment.
First off, let's talk about Advanced Hunting. AH uses a language that internally we call Kusto but we’ve now offer Kusto to the public where it's called “Application Insights Analytics”.
With advanced hunting, we can proactively search and investigate across all your organization’s data. You can query for all kinds of things like query process creation events, network communication events, and yes, even PowerShell events.
Let's get started. I'm assuming you have a WDATP environment to work from (if not, get the trial here) and that you know how to log in (go to https:\\securitycenter.microsoft.com).
Once you're there, select the icon circled in red below.
You can see the Schema properties, along the left hand side of the screen.

Once your there, let's start a new query by clicking on the word "Query" just about the dark blue box that say "Let's start hunting." Kusto is like PowerShell in the way that it will autocomplete and suggest selections for you.
Let's start by using the Schema property of ProcessCreationEvents
 Let's start by using the Schema property of ProcessCreationEvents. You can see how the text begins to autofill as soon as I start typing.
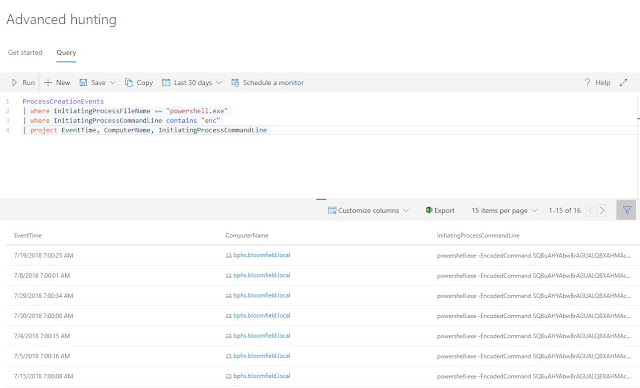
Here is our full Query.

First off, let's talk about Advanced Hunting. AH uses a language that internally we call Kusto but we’ve now offer Kusto to the public where it's called “Application Insights Analytics”.
With advanced hunting, we can proactively search and investigate across all your organization’s data. You can query for all kinds of things like query process creation events, network communication events, and yes, even PowerShell events.
Let's get started. I'm assuming you have a WDATP environment to work from (if not, get the trial here) and that you know how to log in (go to https:\\securitycenter.microsoft.com).
Once you're there, select the icon circled in red below.
You can see the Schema properties, along the left hand side of the screen.

Let's start by using the Schema property of ProcessCreationEvents
Here is our full Query.
We are searching for ProcessCreationEvents where the InititaingProcessFileName is like (= ~) "powershell.exe" and the InitiatingProcessCommandLine "contains" the three letters "enc" for encoded. We could have queried for the InitiatingProcessCommandLine to have been exactly equal to (= =) "encoded" but that returns no data since that isn't the exact command. For our purposes here, the "contains" command works best.
The project command selects the columns to include if you have specific ones you would like. We could have left this blank and we would have returned the default columns.
Now for the fun part. Select Run and here is what we get.
We now have a list of all the times PowerShell has been run with the -EncodedCommand. We can now click on the ComputerName and be taken directly to the machine so we can do more research.
There are so many cool things we can do with Advanced Hunting. Come on back and we'll look at some other queries soon.
Monday, January 29, 2018
Using the REST API to Pull Info from the Microsoft Security Graph
$OAuthUri =
'https://login.microsoftonline.com/common/oauth2/token'
$Body =
@{
resource = 'https://graph.microsoft.com'
client_id = 'getyourclientid'
client_secret = 'getyourclientsecret'
grant_type = 'client_credentials'
redirectUri = "https://localhost:8000"
}
$Response =
Invoke-RestMethod -Method
Post -Uri
$OAuthUri -Body
$Body
$Authorization =
Invoke-RestMethod -Method
Post -Uri
$OAuthUri -Body
$Body -ContentType
"application/x-www-form-urlencoded"
-UseBasicParsing
Write-output
$Authorization
$access_token =
$Authorization.access_token
Write-output
$Authorization.access_token
$Headers =
@{ Authorization = "Bearer
$($Response.access_token)" }
$Uri =
"https://graph.microsoft.com/getyourtenantname/alerts"
$Results =
Invoke-RestMethod -Uri
$Uri -ContentType
application/json -Method
Get -Headers
$Headers
Write-output
$Results
Subscribe to:
Posts (Atom)