Monday, January 23, 2023

Four things you can do to make your environment safer in less than five minutes

As the new year approaches, we often make resolutions in our personal life – things we can do to make our lives better. Maybe it’s exercise, maybe it’s dry January or maybe you’re going to try to read a book a month. This year, I recommend that you make a resolution to improve the security where you work. The five items on this list will help you improve the security of your environment in less than five minutes each.

1. Review privileged groups

Studies have shown that most companies have far too many users in privileged groups. Over time, users may get assigned to admin roles and amass more and more admin privileges over time. If these admin accounts get compromised, they can cause extensive damage to the environment. It's a good idea to check how many users have administrative access, how many of them are Global Administrators, and if there are any invited guests or partners that have not been removed after being assigned to do an administrative task.


With Azure AD Access Reviews, you can manage users assigned to groups, enterprise applications and privileged roles to make sure users don't retain access for extended periods of time when they no longer need it. You can create an Access Review in less than five minutes. Just choose which role you want to be reviewed (Global Admin, Security Admin, etc.), select who will be doing the review of members and a start date and an email will be sent to the reviewer to approve or deny access.


Access reviews can also be used with external users, Microsoft 365 groups as well as Azure resource roles. 


2. Turn on MFA for everyone

MFA is still the number one action you can take to prevent 98% of attacks on your accounts. In a recent article entitled Is MFA the Vegetable of Cybersecurity, I talked about how MFA adds another layer of protection to prevent threat actors from accessing your internal networks.


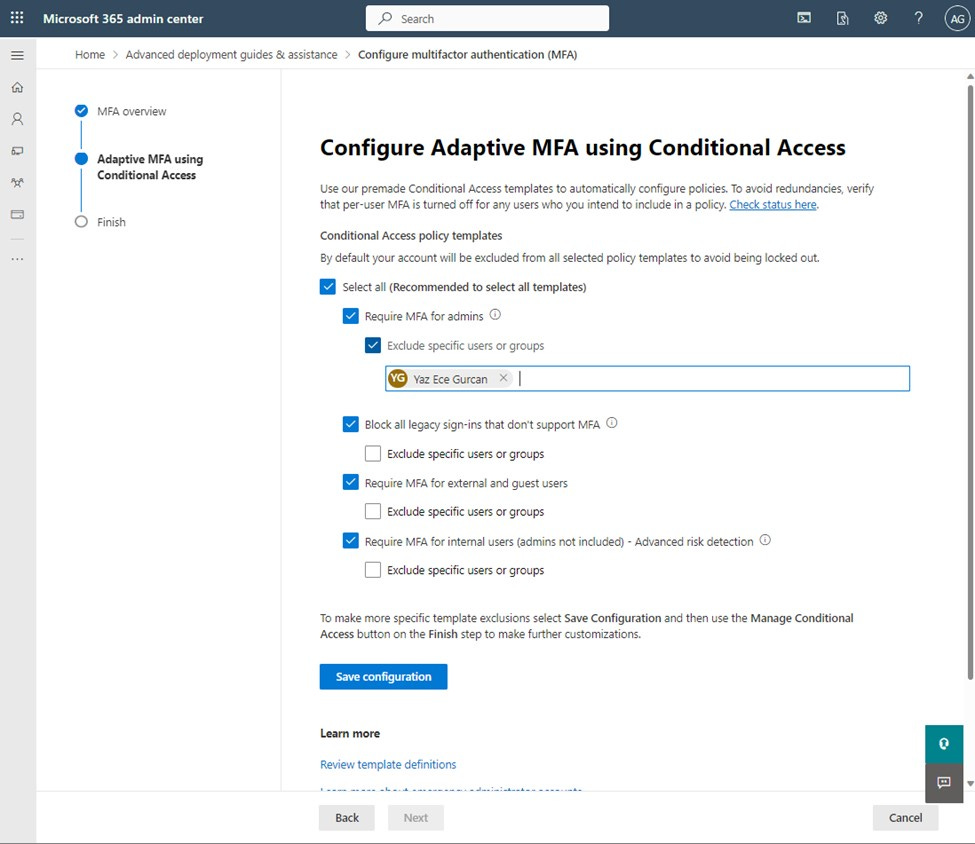
Now, we’ve made it even easier to adopt MFA using the new Zero Trust security model guidance that walks you through the steps to enable adaptive MFA with Conditional Access. You can simply click a check box and turn on policies that include “Require MFA for admins”, “Require MFA for external and guest users”, and “Require MFA for internal users”.

I’ve been surprised to see that many companies aren’t taking advantage of the cloud-protection feature in Defender antivirus. 96% of malware is seen once and never again so static virus definitions aren’t enough. We need machine learning. With the click of a check box, you enable our cloud protection which offers near-instant, automated protection against new and emerging threats. As a cloud service, it uses distributed resources and machine learning to deliver protection to all your endpoints at a rate far faster than traditional security intelligence updates – what we call “block at first sight”.


Within milliseconds of a client encountering a new file, multiple metadata-based machine learning models in the cloud started blocking these threats. Seconds later, our sample-based and detonation-based machine learning models go to work to verify the malicious classification. Within minutes, detonation-based models chime in and add additional confirmation.


Defender AV’s layered approach to security, which uses behavior-based detection algorithms, generics, and heuristics, as well as machine learning models in both the client and the cloud, provides real-time protection against new threats and outbreaks.


4. Enable user and domain impersonation protection

User and domain impersonation techniques have helped enable the rise of business email compromise (BEC) attacks. BEC attacks continue to proliferate showing up in 177 countries and causing losses of $26 billion since 2016. Both user and domain impersonation are forms of phishing where an attacker impersonates a sender address, display name or domain name to resemble a contact the user is familiar with to fool users into trusting them. For example, an address seems to be legitimate at first glance, but when you look more closely you see that an “m” is actually two “n”s, or a lowercase “L” is actually a capital “I”.  Attackers count on the recipient’s previous relationship with the sender to gain their trust for a more authentic attack. This can cause the recipient to reveal confidential information, click on malicious links or even wire money to the sender.


You can easily enable Microsoft Defender for Office 365’s impersonation protection features in the anti-phishing policy. User impersonation protection can protect up to 350 internal users per policy in your organizations, as well as external users such as board members. When Microsoft detects an email with a sender that is impersonating a user, it will take whatever action you configure in the policy. The action could be to quarantine or delete the message or to redirect it to an admin mailbox.

Domain impersonation is also configured in the protection settings of an anti-phishing policy. You can specify a maximum of 50 custom domains in each anti-phishing policy. Each message is checked for impersonation if the message is sent to a recipient that the is in the policy and the appropriate action is applied.

Protect yourself from consent phishing


Application consent (sometimes called OAuth consent) is the process of a user granting authorization to an application to access protected resources on their behalf. It allows users to authenticate third-party apps to use their existing accounts. Think of when you want to play a game on Facebook or maybe download some kind of add-in for Outlook. Often, you’ll be prompted with something that looks like this -


This may not be a big deal when you’re playing Farmville with your personal account but when a corporate user checks that check box to “Consent on behalf of your organization”, that user could literally be giving that application permissions to your entire organization. In fact, this particular method was used during the SolarWinds/Solorigate campaign so we’ve known about it for some time. Yet many people still haven’t put protections in place to prevent it.

One of the biggest issues with this type of attack is that normal remediation steps, like resetting passwords or requiring MFA, are not effective since these are third-party applications and are external to the organization. These attacks leverage an interaction model that presumes the entity that is calling the information is automation and not a human. We’ve also seen an increase in “consent phishing” where attackers use social engineering techniques to fool a user into granting consent. 

But there are a few ways to restrict user consent to help reduce your surface area and mitigate this risk.

Turn off user application consent

You can quickly stop users from being able to give permissions to applications or just limit which apps they can consent to like applications that have been published by a verified publisher.

  1. Sign in to the Azure portal as a Global Administrator.
  2. Select Azure Active Directory > Enterprise applications > Consent and permissions > User consent settings.
  3. Under User consent for applications, select “Do not allow user consent”.

Create an app consent workflow

As you can see above, once we stop allowing users to grant consent it could mean more work for the admins. And y’all are busy enough as it is. So let’s put a policy in place to enable users to request access to applications that require admin consent.

  1. Sign-in to the Azure portal with one of the roles listed in the prerequisites.
  2. Search for and select Azure Active Directory.
  3. Select Enterprise applications.
  4. Under Manage, select User settings. Under Admin consent requests, select Yes for Users can request admin consent to apps they are unable to consent to.


5.  Configure the following settings:

·        Select who will serve as reviewers for admin consent requests - Reviewers can view, block, or deny admin consent requests, but only global administrators can approve admin consent requests. People designated as reviewers can view incoming requests in the My Pending tab after they have been set as reviewers. Any new reviewers won't be able to act on existing or expired admin consent requests.

·        Selected who will receive email notifications for requests - Enable or disable email notifications to the reviewers when a request is made.

·        Selected who will receive request expiration reminders - Enable or disable reminder email notifications to the reviewers when a request is about to expire.

·        Consent request expires after (days) - Specify how long requests stay valid.

After a request is made, you can allow all users to access by granting consent on behalf of all users. Or you can grant consent to a single user using PowerShell.  You can also use application assignment and Conditional Access to restrict user access to specific apps.


Now, this doesn’t help when it comes to applications that might already have been given access to your environment but I’ll talk about that in another post.


Thursday, August 27, 2020

Get Familiar with Azure Sentinel Bookmarks

So last week we talked about the difference between Workbooks, Playbooks and Notebooks in Azure Sentinel. But there is still one more "book" that is important to making your life easier when working with the cloud-based SIEM. It's called a bookmark.

What is a bookmark exactly? I'm glad you asked. Just like a bookmark help you keep track of the last page you read in a physical book (am I the only one who still reads physical books?), a bookmark in Azure Sentinel helps you keep track of items you might want to revisit while you're threat hunting. 

As you know, threat hunting usually has you looking through mountains of logs to find evidence of malicious behavior. During the hunting process, you may come across matches or findings, dashboards, or activities that look unusual or suspicious. In order to mark those items so you can come back to them in the future, use the bookmark functionality. Bookmarks let you save items for later, to be used to create a case for investigation.

While you're hunting, you'll probably come up with a hypotheses about what is going on. Bookmarks in  help you do this by preserving the queries you ran along with the query results that you deem relevant. You can also record your contextual observations and reference your findings by adding notes and tags. Bookmarked data is visible to you and your teammates for easy collaboration. 

You can revisit your bookmarked data at any time on the Bookmarks tab of the Hunting pane. You can use filtering and search options to quickly find specific data for your current investigation. 

You can also visualize your bookmarked data, by clicking Investigate from within the Bookmark itself. This launches the investigation experience in which you can view, investigate, and visually communicate your findings using an interactive entity-graph diagram and timeline.

How do you add a Bookmark?

  1. In the Sentinel portal, navigate to Threat management - Hunting.
  2. Select one of the hunting queries and on the right.
  3. In the hunting query details, select Run Query.
  4. Select View query results. For example:

      5. From the log query results list, you can use the checkboxes to select the info you find compelling.
      6. Now, select Add bookmark.


     7. Give your Bookmark a name and add any tags or notes you need to help you remember what was interesting about this information in the first place.
     8. Click Save and off you go with a new Bookmark that you or your fellow investigator can refer to in the future.

Friday, August 7, 2020

Workbooks, Playbooks and Notebooks. Oh my! Part 3

We talked about those new to Azure Sentinel might find the terms Workbook, Playbook and Notebook confusing. The other day we defined Azure Sentinel Workbooks. See here if you missed it. And here to read about Playbooks.

Notebooks

I like to think of notebooks just like I did back in high school. A notebook is a place where you keep stuff you want to use later. In Azure Sentinel, it's a repository of complex organizations and tasks that you use for investigations. 

Notebooks are like step-by-step notes that you build to walk through the steps of an investigation and hunt. They encapsulate all the hunting steps in a reusable form that can be shared with others in your organization. 
You can automate common investigative steps such as:

  • Gathering additional entity information
  • Query Azure Sentinel data about, users, machines, IPs, or any other entity
  • Enrich it with other services to visualize the results
  • And trigger actions

In Azure Sentinel, you will be using the Jupyter experience which is integrated into the portal. You don't need to do an installation at all. Jupyter is an environment based on IPython that enables interactive programming and data analysis using a variety of programming languages, including Python. Jupyter notebooks enjoy widespread use in research and academia for mathematical modeling, machine learning, statistical analysis, and for teaching and learning how to code.

They are very flexible and a have a huge collection of libraries for machine learning, visualization, and data analysis. Notebooks have a "*.ipynb" file extension - which stand for IPython notebook. Jupyter notebooks were originally known as IPython (Interactive Python) notebooks, and they only supported Python as a programming language. The name Jupyter is a combination of Julia, Python, and R — the core programming languages that Jupyter supports.

Jupyter notebooks are composed of cells. Each cell is assigned one of three types:
  • Markdown for entering text in markdown format
  • Code for entering code that runs interactively
  • Raw NBConvert for entering data inline
Code entered into code cells is executed by a kernel, which provides an isolated environment for the notebook to run in. In Azure Notebooks, by default, this kernel runs on Azure Free Cloud Compute and Storage. The popular IPython kernel supports code written in Python, but dozens of other kernels are available supporting other languages. Azure Notebooks support Python, R, and F# out of the box. They also support the installation of the many packages and libraries that are commonly used in research.

One of the cool things about Azure Notebooks — and Python in general — is there are thousands of open-source libraries you can leverage to perform complex tasks without writing a lot of code

As with most of the entities in Sentinel, there are several pre-built Notebooks or you can create your own. The Azure Sentinel Community GitHub repository is the location for any future Azure Sentinel notebooks built by Microsoft or contributed from the community.

Now, I know that sounds like a lot. And it is. Notebooks are not super easy to learn. Here are a few resources for you to get started.

Wednesday, July 29, 2020

Workbooks, Playbooks and Notebooks. Oh my! Part 2

The other day we talked about those new to Azure Sentinel might find the terms Workbook, Playbook and Notebook confusing. The other day we defined Azure Sentinel Workbooks. See here if you missed it. 

Playbooks

Today, we're going to talk about Playbooks. What exactly is a Playbook in Azure Sentinel? I'm glad you asked.

A Playbook is really just another way of saying automated response. A Playbook is a collection of procedures that can be kicked off in response to an alert. You can do anything from opening a ticket in ServiceNow to blocking a suspicious IP or disabling a user in Azure AD. You can use them to tackle the most frequent threats that your organization faces so that you can spend your time on elsewhere.

Alert fatigue is real. Security analysts face a huge burden of more alerts than they can respond to. Automation increases efficiency and fills the security gap by allowing a Playbook to lift the burden of reviewing every incident. 

Playbooks in Azure Sentinel are based on Azure Logic Apps and the can be run manually as an on-demand response to a selected alert or set to run automatically when specific alerts are triggered. It's up to you.

It can be a little daunting at first, if you've never used Logic Apps but once you play around a little, you'll start understanding how it works. Here is some documentation to help with this.

Below, is an example of a Playbook that will isolate a machine if you get an alert from MDATP.

The first thing we do, is add the trigger. Here the trigger is a manual step by an admin responding to an Azure Sentinel Alert. It could be an automated trigger but in this case we're expecting a person to do something first.

Then we choose an Action. In this case we are using Alert - Get Incident which returns information about the incident associated with the alert like the workspace and the actual alert ID. 

Then we use the Action Alert - Get hosts which returns list of hosts associated with the alert.

Then we use a condition that says for each alert isolate the machine.

Think how much time you could save by creating automated Playbooks to respond to alerts. 
The same GitHub repository we mentioned the other day has a selection of pre-built Playbooks you can use or you can create your own.